What you need before you calculate
- The clear span between the post inside faces, measured with a level tape.
- The actual face width of one baluster.
- The maximum clear opening the project has to meet.
- The total rise and horizontal run of the flight, if you want the slope and the along-rail numbers.
- Both newel post widths, measured along the run.
Measure the span, not the rail
Hold the tape level from the inside face of the starting post to the inside face of the ending post. That is the horizontal span, and it is the length that spaces vertical balusters. The sloped rail is longer than this by 1 / cos(slope) — about 12% on a 26° stair — so if you lay out equal divisions of the rail and then check the horizontal gaps, they will be smaller than what you divided.
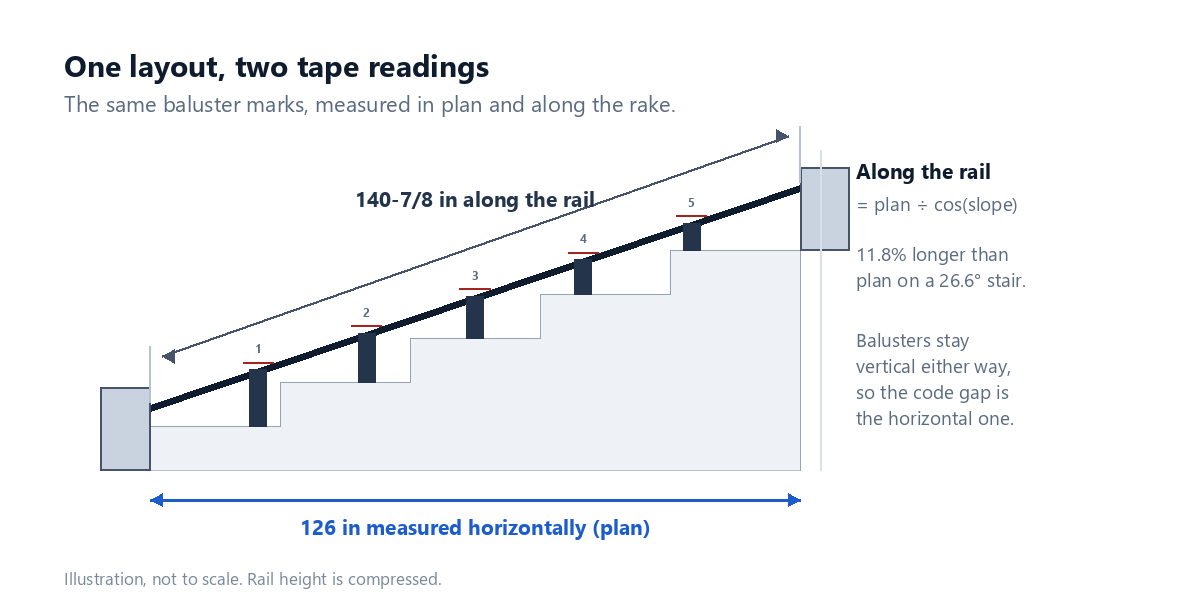
A quick sanity check: a 10′-6″ run with a 5′-3″ rise is a 26.6° stair. cos(26.6°) is 0.894, so a 140−7/8 in tape reading along the rail corresponds to a 126 in horizontal span. If your two numbers do not sit in that ratio, one of them is wrong.
Step 1: choose the opening limit
The limit applies to the clear distance between the faces of two adjacent balusters. In US residential work you will usually be working to a 4 in sphere provision in the guard section of the IRC, but adoptions differ and local amendments are real. Commercial, industrial and historic projects can follow something else entirely, and some manufacturers publish a tighter maximum for their system.
Write the number down before you start, then treat it as a hard ceiling. If the finished opening comes out at 4-1/16 in, the layout fails even though the arithmetic looks tidy.
Step 2: solve for the baluster count
If you place n balusters, you also create n + 1 clear openings — one before the first baluster and one after the last. The span has to hold the balusters plus those openings:
Compute the right-hand side, round it up to a whole number, and that is your minimum count. Then recompute the opening from the rounded count: it will be at or slightly below your limit, never above.
Worked example
Step 3: place the marks from one datum
Pick a datum you can physically hook a tape on: the inside face of the starting post is the usual choice. Then compute every baluster from that point.
For the example, baluster 1 centers at 3.8125 + 0.75 = 4.5625 in, baluster 2 at 9.875 in, and baluster 23 at 121.4375 in. Each is computed independently from the datum.
Do not do the tempting shortcut: mark the first baluster, add 5-5/16 in, add it again, and keep going. Every time you read a rounded number off a tape and add the next spacing to it, you inherit that rounding. On a 23-baluster run, half a sixteenth per step is more than half an inch of accumulated drift by the top post, which is exactly where it shows.
Step 4: transfer the marks to a sloped rail
Balusters are vertical, so a plan mark and a rail mark are not the same point in space. Choose one reference and stay with it.
| Reference | Best for | Watch out for |
|---|---|---|
| Horizontal (plan) | Checking the code dimension, or working from a floor with the rail off | Every rail mark needs a plumb line up to the rail |
| Along the sloped rail | Marking and drilling with the rail in place | Along-rail distances are longer than plan distances; convert before comparing |
| Along the bottom rail or stringer | Installing shoe-mounted or surface-mounted balusters | Rail thickness and shoe offset shift the effective datum |
Whichever you pick, the last baluster is your control point. Measure its position from the far post as well as from the datum. If the two numbers do not agree, the span or the count is wrong, and it is much cheaper to find that out on paper than on a drilled rail.
The five mistakes that cost the most time
- Using the rail length as the span. It is 10–15% longer than the plan span on a typical stair, which quietly changes the count and every mark.
- Using the nominal baluster size. A nominal 2x2 is 1-1/2 in. The half inch you did not account for shows up in every opening.
- Confusing clear opening with center-to-center. A 4 in center distance with a 1-1/2 in baluster leaves a 2-1/2 in opening. A 4 in opening needs 5-1/2 in centers.
- Forgetting the post widths. If you measured outside face to outside face and did not deduct both posts, the span is short by 6 in on a pair of 3 in posts.
- Adding rounded spacings. Compute each mark from the datum and the drift disappears.
When the numbers will not work
Some inputs have no valid layout. If the span is barely wider than a baluster, or if you demand a large end margin while also demanding a small opening, the constraints contradict each other. The planner says so and tells you which constraint is binding instead of producing a layout that violates one of them.
The usual fixes, in order of least visual damage: narrow the balusters, accept a slightly smaller opening than your maximum (the limit is a ceiling, not a target), or change the end treatment so the span between posts changes.
Check the result
Multiply the opening by the number of gaps and add the balusters: it should equal the span to the thousandth of an inch. Then check the same arithmetic using the printed decimal and fractional columns — they should describe the same position. If they do not, you are reading a column that belongs to a different reference.
The stair baluster spacing calculator performs all four steps at once, shows the elevation, and prints the schedule. If you want the algebra on its own terms, read the baluster spacing formula explained.
Need the count rather than the marks? See how many balusters you need for common spans, and baluster spacing by baluster size if you already know the profile. For the opening limit itself, read the 4-inch sphere rule.